If you’ve ever had a warning light pop up on your dashboard and wished you could see exactly what’s wrong — you’re in the right place.
Today, we’ll walk you through how to connect and use two popular models — Vident iAuto701 and Launch X431 PRO Lite V3.0
-
Vident iAuto701 – Wired Connection: Reliable, plug-and-play diagnostics via a direct OBD-II cable. No charging needed — it powers from your car’s battery. Great for workshop environments where a solid physical link is preferred.
-
Launch X431 Pro Lite V3.0– Wireless Connection: Uses a Bluetooth VCI (Vehicle Communication Interface) for cable-free diagnostics. Perfect if you want to move freely around the vehicle while testing components, or if your OBD port is in an awkward spot.
Step 1: Registration & Software Update
Keeping your scan tool updated means you’ll have the latest vehicle coverage, bug fixes, and features.
Vident iAuto701
Registration
- Go to the official Vident website: www.videnttech.com
- Click "Register" and create an account.
- Log in, then enter your tool’s Serial Number (SN) and Activation Code (found in the “About” section of your device menu).
- Bind the device to your account.
Software Update
- Download and install the iScanzilla update software from Vident’s website.
- Connect the iAuto701 scan tool to your PC via USB.
- Log in to iScanzilla with your registered account.
- Click "Update" to download and install the latest software packages.
Launch PRO Lite V3.0
Registration
- Power on the device and connect to Wi-Fi.
- From the home screen, tap "User" → "Register".
- Enter your email address, create a password, and input your Serial Number & Activation Code.
- Confirm registration — your scan tool will be linked to your Launch account.
Software Update
- From the home screen, tap "Upgrade".
- The system will list all available vehicle software updates.
- Tap "Update All" or choose individual brands to update.
- Keep the device connected to power and Wi-Fi during the process.
💡 Tip: Launch scan tool updates are usually free for the first 1–2 years depending on your package.
Step 2: Locate Your OBD-II Port
In most NZ/AU cars made after 2006, you’ll find it under the dashboard near the steering column.
Look for a 16-pin trapezoid-shaped connector.
💡 Pro Tip: Some utes and European models hide it behind a small cover.
Vident iAuto701 (Wired)
- Turn ignition to ON (engine off).
- Plug the OBD-II cable directly into the port — instant power, no pairing required.
Launch X431 Pro Lite V3.0 (Wireless)
- Plug the small Bluetooth VCI dongle into the OBD-II port.
- The scan tool connects automatically to the VCI via wireless signal.
- This lets you walk around the vehicle or even stand at the bonnet while running live tests.
Step 4: Select Vehicle Make & Model
On iAuto701 and Pro lite V3.0, use the arrow keys or touchscreen to select:
Diagnosis → Vehicle Selection → Auto Scan or Manual Scan.
💡Not all car models can support auto scan.
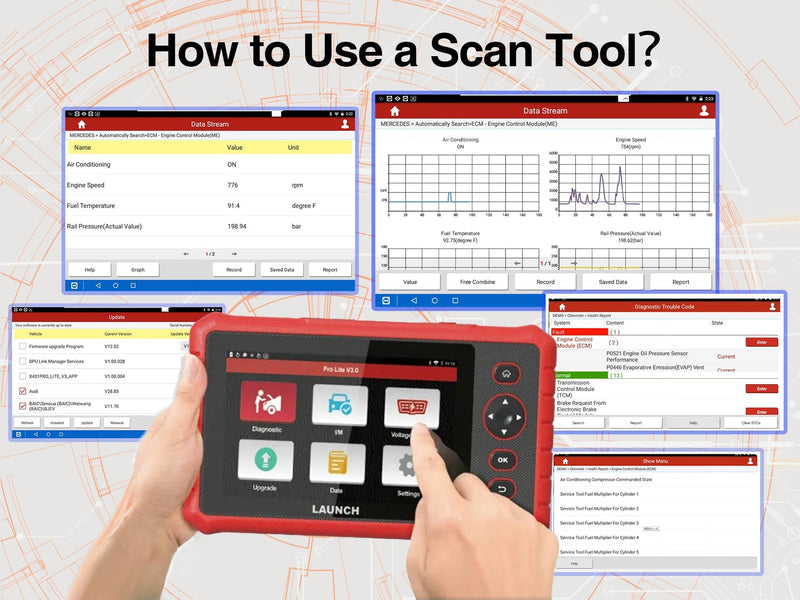
Step 5: Reading Fault Codes
- The tool communicates with your ECU and lists any Current, Pending, or History codes.
- Highlight a code to see a short description — or use the built-in code lookup.
Step 6: Finding Problems
- View Live Data to see real-time readings like engine RPM, etc.
- Based on data and fault code analysis, repair or replace components.
Step 7: Clearing Codes
Once the issue is fixed:
- Select Clear DTCs from the menu.
- Warning lights should disappear after clearing — but they’ll come back if the fault remains
Final Thoughts
Different scan tools may have different diagnostic connection methoods and interface displays, depending on the specific products.
Whether you choose the wired connection scan tool or the wireless Bluetooth scan tool, they can all help you check for faults.